








I once tried to cram too much gold into a tiny bun and ended up with pins and pearls sliding across my hair during the mandap. That taught me to build the braid as structure first, then add jewelry and a heavy dupatta second. Below are 15 bridal braid hairstyle ideas built to sit with gold jewelry and weighty dupattas, for fine to very long hair and a mix of wedding vibes.
These looks lean soft, romantic, and veil-friendly. Most need a 10 to 20 minute morning touch-up if you do a simple trial copy at home; the pinned updos are scene-ready for an eight-hour day. I favored styles that stay put under heavy fabric and heavy jewelry, plus a few options for shorter or fine hair so no one feels left out.
15 Bridal Braid Hairstyle Ideas That Hold Up to Heavy Dupattas and Gold Jewelry
Gilded Age Crown Braid Updo


Best for medium to long hair. Trim every 10 to 12 weeks. Build at your trial, not the morning of.
This is my go-to when I need a veil-friendly, regal silhouette that still photographs soft. The braid sits higher on the head so the dupatta can rest behind it without flattening the profile. Ask your stylist for a crown braid with lifted volume through the top and tucked, pinned ends.
Technique detail. Start braiding with 2-inch sections to keep the braid visible from the side, then pull gently along the braid to create soft texture. Mistake to avoid. Don’t over-tease the crown; too much backcombing gives a helmeted look and fights the dupatta.
Half-Up, Half-Down Braided Wedding Style


Best for all lengths that reach the collarbone or longer. Lets you sleep on second-day hair.
This is what I wore to a close friend's wedding when I wanted movement but also structure under her heavy dupatta. The top section anchors jewelry and the veil while the lower lengths flow for dancing. It flatters round and heart faces because the loose pieces soften the jawline.
Technique detail. Braid only the top third, pinning the tail under the crown so the lower lengths stay free. Mistake to avoid. Sewing or gluing jewels into the loose lengths will tangle; pin jewelry to the braided section only.
Fishtail Braid Updo


Best for thick or medium hair. Schedule a trial to test hold under heavy jewelry.
A fishtail gives an editorial woven texture that still reads bridal from the back. I once tried a delicate fishtail without enough pins and it sagged under a heavy necklace; secure it with discreet bobby pins so the weight transfers to the scalp, not the braid tail.
Technique detail. Use small, even sections for a tight fishtail near the scalp, then loosen only the outer loops to create soft volume. Mistake to avoid. Avoid making the whole braid too loose if you have gold chandbalis that will tug.
Dutch Braid Crown
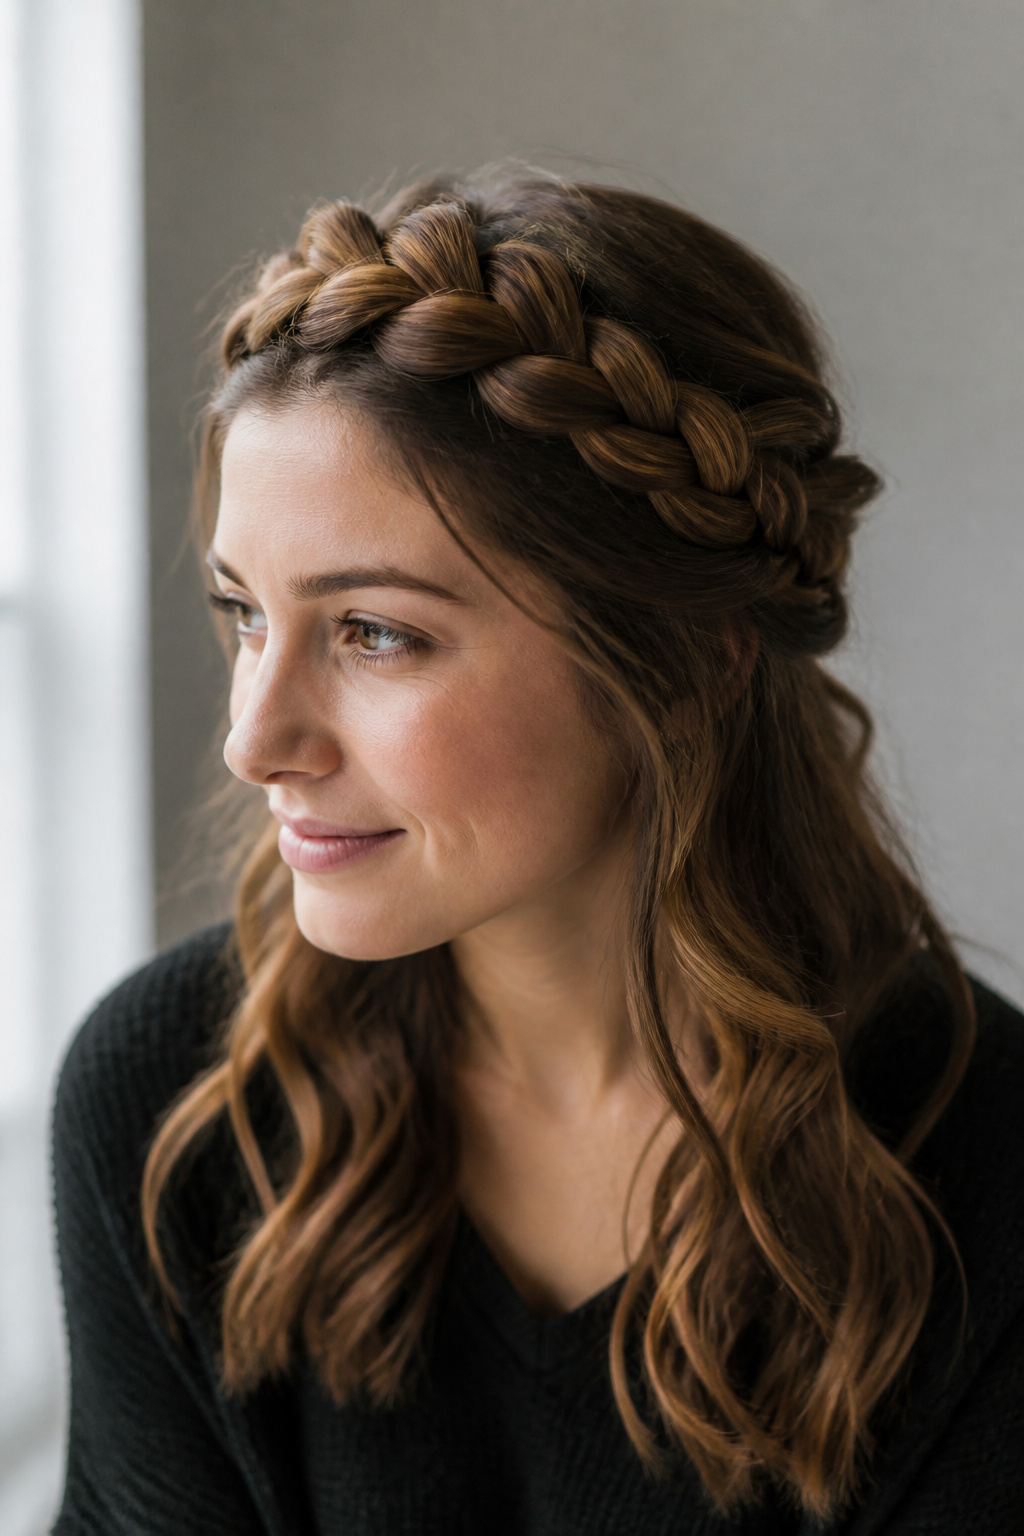

Best for medium to long hair. Stays put outdoors and in wind.
This raised halo looks more defined than a soft boho braid and keeps the face open for jewelry. It is an easy answer to “bridal, not childish” because the structure is mature and balanced. My stylist left two face-framing pieces to soften the look, and it photographed beautifully under the dupatta.
Technique detail. Braid Dutch-style with 1.5 to 2-inch sections and pin every 3 to 4 inches for stability. Mistake to avoid. Don’t leave the braid too tight against the scalp; you lose that soft crown lift.
Victorian Twisted Braid Updo


Best for fine to medium hair. Compact shape holds a dupatta well.
This retro-tinged style reads formal and pairs beautifully with heavy gold sets. It was the trick my cousin used when her hair was fine but she wanted a structured base for a heavy matha patti. The twist technique creates volume without backcombing.
Technique detail. Twist small sections and pin into a low knot; add a thin padding if your hair is very fine. Mistake to avoid. Don’t skip smoothing serum near the nape or fine hairs will frizz where the dupatta rubs.
Upswept Romantic Braid


Best for all lengths that can gather at the crown. Looks fresh through reception.
This gives lift and movement while keeping the hair off the neck. It felt like the perfect compromise when my hair needed to be soft but I did not want a rigid chignon. The result is romantic and veil-friendly.
Technique detail. Sweep hair upward and braid loosely from the crown, stop about two-thirds down and pin the tail up into a soft coil. Mistake to avoid. Pulling the entire braid apart makes the base unstable under heavy jewelry.
Classic Three-Strand Braid with Floral Embellishments


Best for long hair. Very durable and easy to accessorize.
This is the most wearable classic. For a garden wedding I wove small jasmine clusters into the length and the look lasted through an eight-hour function. It’s a straightforward way to wear gold hair pins as accents without overloading the scalp.
Technique detail. Keep the braid tight for the first two-thirds and soften only the lower section for a balanced silhouette. Mistake to avoid. Do not pin heavy jewelry midway down the braid; it pulls and makes the braid sag.
Messy Bridal Braid


Best for medium to long hair. Very forgiving and wears well into the evening.
“Messy” can read modern, not sloppy. The trick is controlled pull-apart texture that looks intentional. I over-pulled mine once and it turned into a tangled knot on the dance floor; moderation is the secret.
Technique detail. After braiding, use your fingers to loosen sections no wider than 1 inch. Mistake to avoid. Don’t use heavy, sticky product before pulling apart or you’ll get a crunchy, fake finish.
Braided Half-Up with Loose Lengths


Best for medium to long hair. Good for brides who want hair down for photos.
This is the half-up variant that held my veil and my heavy gold jhoomar without tugging on the loose lengths. It frames the face and keeps the top secure for rituals.
Technique detail. Secure the braid tail under the crown with U-pins and then spray the connection with a flexible finish. Mistake to avoid. Don’t anchor the veil into the loose ends; attach it to the braided base.
Boho Braided Wedding Style with Texture Emphasis


Best for medium to long hair. Pairs well with outdoor and rustic venues.
This leans into the “beautifully messy” trend without being careless. Texturizing spray and a few well-placed pins keep everything intact under a dupatta. I used this style for a morning ceremony and loved how it moved in photographs.
Technique detail. Build texture first with a salt or texturizing spray, then braid loosely and pull small sections for volume. Mistake to avoid. Don’t confuse messy with unpinned; always anchor the braid with hidden pins.
Long-Hair Bridal Braid with Veil-Friendly Base
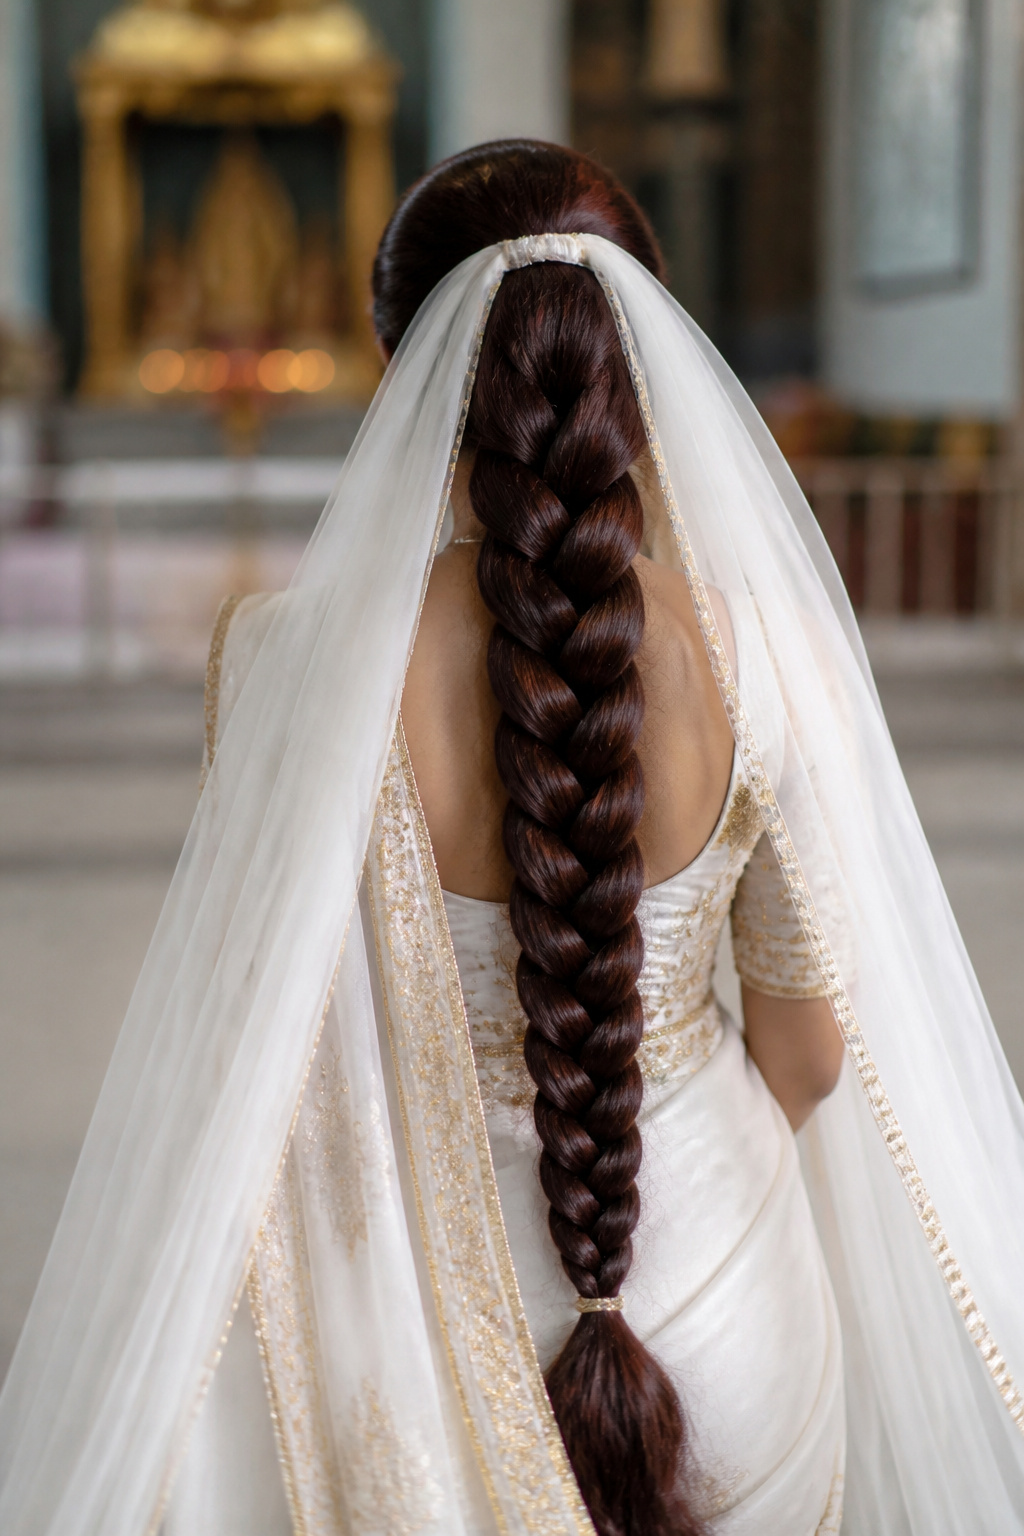

Best for very long hair. Designed to support veil placement and stay photo-ready.
If you have length, use the braid as an anchor. My sister’s veil sat perfectly above a braided base for the entire reception because her stylist tucked the comb into the braids, not the hairline.
Technique detail. Create a flat plait near the scalp where the veil will sit, then build the rest of the braid normally. Mistake to avoid. Don’t pin the veil only into the fabric of the dupatta; pin into the braid structure itself.
Bridal Braid with Face-Framing Softness
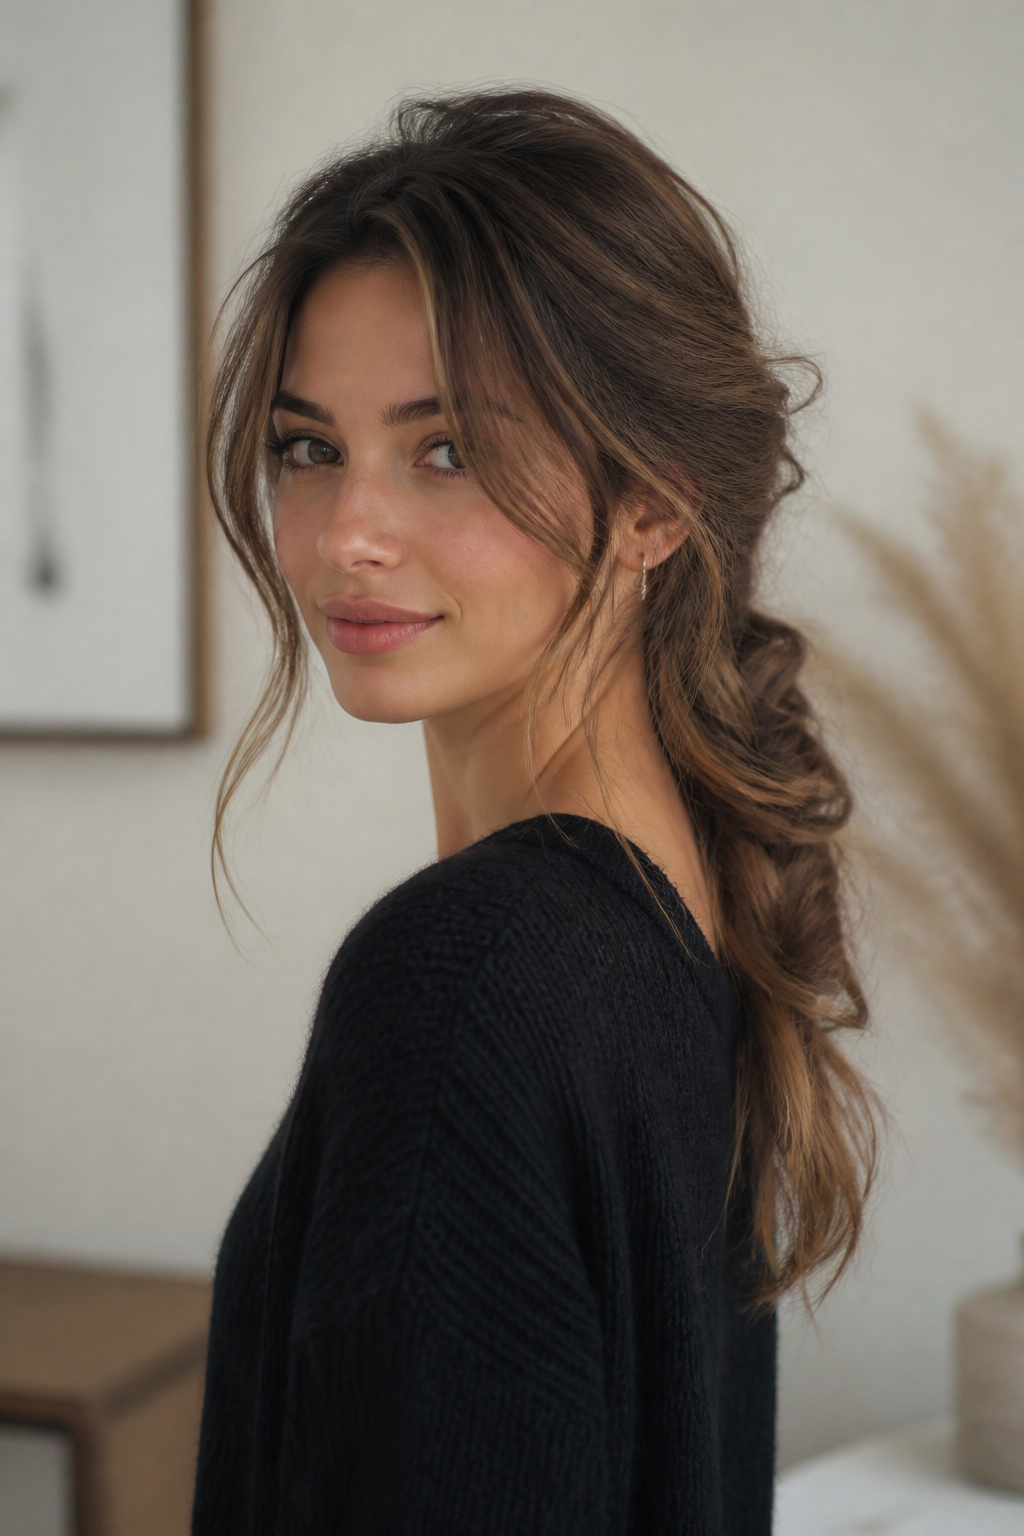

Best for medium to long hair. Very forgiving if pieces shift during the day.
This is the style I recommend if you want romance without a severe profile. Face-framing pieces are left intentionally softer than the rest so jewelry like a maang tikka sits without looking heavy.
Technique detail. Leave 1 to 2-inch face pieces and curl them on a 1-inch barrel away from the face. Mistake to avoid. Avoid too-tight slicking of the front; it will fight the soft braid and look harsh.
Bridesmaid and Guest Braid Styling


Best for medium to long hair. Adaptable for bridesmaids and guests.
Not every braid must be bridal-level structure. For bridesmaids who need to move and dance, a polished braid with a relaxed finish reads appropriate and is faster to do. I styled six bridesmaids in this look in under an hour with the right pins.
Technique detail. Use elastic to secure the braid before pinning to save time. Mistake to avoid. Don’t try to replicate a heavy jeweled bride look for bridesmaids; it upstages and risks slipping.
Easy Wedding Braid for Short to Mid-Length Hair


Best for short to shoulder-length hair. Shows that chin-length styles can be bridal too.
Short hair is underrepresented in bridal braid roundups, but you can achieve a halo or partial braid that secures a dupatta. I used small Dutch braids meeting at the back on a bride with chin-length hair and the look felt modern and secure.
Technique detail. Use 1-inch sections and small elastic loops; tuck ends into a small twist at the nape. Mistake to avoid. Don’t expect a waist-length plait; accept the scaled-down braid and embellish close to the scalp.
Regal Rope Braid with Gold Jewelry


Best for long, thick hair. Built to carry gold pieces and a heavy dupatta.
This rope braid was my final look at a reception and it survived a heavy dupatta and multiple jewelry adjustments. The rope texture spreads weight evenly and gives a neat vertical line for photos.
Technique detail. Wrap two equal sections tightly and pin every 3 to 4 inches so the jewelry rests on pins, not hair. Mistake to avoid. Do not clip heavy chains directly to the braid without a pin anchor.
What You'll Need to Get This Look
Heat Tools
1.25-inch ceramic curling wand ($35 to $65)
1-inch titanium flat iron ($40 to $90)
Blow dryer with diffuser attachment ($30 to $120)
Styling Products
Texturizing spray, 6oz ($8 to $25)
Flexible hold finishing spray, 10oz ($7 to $30)
Alcohol-free volumizing mousse, 8oz ($6 to $20)
Hair Care and Protection
Heat protectant spray, 5oz ($6 to $25)
Accessories and Finishing
Assorted bobby pins pack, 200 count ($5 to $12)
Veil pins and comb set ($6 to $20)
Gold hair pins set, 12 pieces ($8 to $30)
Budget Swaps
Drugstore texturizing spray, 6oz ($6 to $12)
Drugstore finishing spray, 10oz ($5 to $10)
Shopping Tips for These Looks
Buy tools during holiday sales: Blowout tools drop 20 to 30 percent in November. I picked up my 1-inch titanium flat iron on sale and it was worth waiting for.
Choose flexible hold over lacquer: For braids that must move with a dupatta, choose a flexible finish rather than a rock-hard spray. Try the Flexible hold finishing spray, 10oz.
Buy bobby pins in bulk: You will lose more pins than you expect at trials. Grab the Assorted bobby pins pack, 200 count.
Keep a small kit on the day: Pack a travel texturizer, a few pins, and a compact finishing spray. I carry the Texturizing spray, 6oz in my day bag.
Frequently Asked Questions
How do I make a braid hold under a heavy dupatta?
Anchor the veil to the braided base, not to the hairline. Use long U-pins and a few hidden bobby pins into the braid structure for stability. Consider a veil comb and the Veil pins and comb set.
Can short hair look bridal with a braid?
Yes. Small Dutch braids or halo twists scale down beautifully and you can use pins to hide ends. Clip-in extensions are an option if you want length quickly; try lightweight clips for natural movement.
What products prevent frizz when a dupatta rubs the nape?
A smoothing serum near the nape and a flexible finishing spray help. I recommend a light heat protectant and the Heat protectant spray, 5oz.
How early should I schedule a trial for a bridal braid hairstyle?
Book a trial 6 to 8 weeks out so your stylist can test pins, veil placement, and jewelry weight on the exact day timeline.
My hair is fine and won’t hold a heavy braid. What then?
Use padding under the braid and small silicone-filled elastics to create anchor points. Texturizing spray helps add grip without stiffness.
Where to Start
Pick one photo from this list that matches your dupatta and jewelry plan and bring it to your trial. If you are unsure, start with a half-up, half-down braid for its versatility and test how the dupatta sits. Which of these looks do you want to try first for your ceremony?


